스프링의 web.xml에 utf-8 filter 를 추가 해주고도 한글이 께진다면
tomcat 서버의 다음과 같이 설정을 해주면 한글 깨짐을 방지 할 수 있다.
/usr/local/tomcat/conf/server.xml
<Connector port="8080" protocol="HTTP/1.1"
connectionTimeout="20000"
redirectPort="8443" URIEncoding="UTF-8" />
java, c# , linux, program devloper
blog.visualp.com
734 Entries : Results for java, tomcat, c#
- Posted
- Filed under Linux
- Response
- You can track responses via RSS / ATOM feed


- Posted
- Filed under PHP
foreach($_REQUEST as $key => $value ){
${"$key"} = $value;
}
${"$key"} = $value;
}
- Response
- You can track responses via RSS / ATOM feed
- Posted
- Filed under centos7
If you receive an error while restarting IPtables on your virtual machine that includes : raw nat mangle filter [FAILED] or similar, this is a known error with CentOS 5 / CentOS 6 on virtual architectures. You simply need to modify the : /etc/init.d/iptables file.
===참고
https://www.hostvirtual.com/kb/6383/IPtables-returns-an-error--security-raw-nat-mangle-filter-FAILED.html
===
Next, locate the below text, you can search for 'setting chains' Next add the lines labeled with + to the file, after the line with: case "$i"
vi /etc/init.d/iptables
echo -n $"${IPTABLES}: Setting chains to policy $policy: "
ret=0
for i in $tables; do
echo -n "$i "
case "$i" in
<!-- 추가된 부분 -->
+ security)
+ $IPTABLES -t filter -P INPUT $policy \
+ && $IPTABLES -t filter -P OUTPUT $policy \
+ && $IPTABLES -t filter -P FORWARD $policy \
+ || let ret+=1
+ ;;
raw)
$IPTABLES -t raw -P PREROUTING $policy \
&& $IPTABLES -t raw -P OUTPUT $policy \
|| let ret+=1
;;
- Response
- You can track responses via RSS / ATOM feed
- Posted
- Filed under JSP, JAVA
[출처]-http://nimba.tistory.com/472
* java
String orderKind = "wbsalecount";
Map<String, Object> condition = new HashMap<String, Object>();
condition.put("orderKind" , orderKind );
* mybatis
<select id="selDomainMap1" parameterType="java.util.Map" resultMap="libroBestsellerResultMap">
...
<trim prefix="ORDER BY">
<if test="orderKind == 'wbrank'"> A.WB_RANK ASC </if>
<if test="orderKind == 'wbsalecount'"> A.WB_SALE_COUNT DESC </if>
</trim>
...
</select>
- Response
- You can track responses via RSS / ATOM feed
- Posted
- Filed under Htm&Javascript
$(document).ready(function() {
$(".telnumber").keyup(function(){
$(this).val($(this).val().replace(/[^0-9]/g,""));
});
$(".name").keyup(function(){
$(this).val($(this).val().replace(/[^\!-z]/g,""));
});
});
- Response
- You can track responses via RSS / ATOM feed
- Posted
- Filed under JSP, JAVA
Package Explorer

Problems View

JQuery min Validation Error 없애기
Eclipse 의 Package Explorer 에서 JQuery min Validation Error 가 발생하는 프로젝트를 선택한 후 마우스 오른쪽 버튼을 클릭하여 Properties 메뉴를 선택합니다.
Properties 창이 나타나면, 좌측의 메뉴에서 Javascript > Include Path (1) 메뉴를 선택한 후 Source (2) Tab 을 선택합니다. 해당 프로젝트를 확장한 후 하위의 Excluded (3) 을 선택 한 후 Edit (4) 버튼을 클릭합니다.

Inclusion and Exclusion Patterns 창이 나타나면 Exclusion patterns 항목의 [Add] (1) 버튼을 클릭합니다.

Pattern 입력 항목에 **/jquery*.js (1) 과 같이 입력합니다. 현재 선택된 프로젝트의 모든 디렉토리에서 jquery*.js 파일명은 제외한다는 의미입니다.

Exclusion patterns 항목을 확인 한 후 [Finish] 버튼을 클릭합니다.

Source Tab 에서 Excluded 항목 설정을 확인한 후 [OK] 버튼을 클릭합니다

Package Explorer 또는 Problems View 에서 JQuery min 관련 Error 이 사라졌는지 확인합니다.
[출처]:http://blog.beany.co.kr/archives/1343
- Response
- You can track responses via RSS / ATOM feed
- Posted
- Filed under JSP, JAVA
java.lang.OutOfMemoryError: PermGen space
이클립스의 톱켓에 다음과 같은 옵션을 추가 한다.
-XX:PermSize=256m -XX:MaxPermSize=256m
이클립스의 톱켓에 다음과 같은 옵션을 추가 한다.
-XX:PermSize=256m -XX:MaxPermSize=256m
이클립스에서
servers 탭의 해당하는 tomcat 선택 후 -> F3 -> Overview - General Information 하단의 Open launch configuration 클릭 후
Edit Configuration 창의 Arguments 탭을 선택 후 VM arguments: 입력란의 마지막 라인에
-XX:PermSize=256m -XX:MaxPermSize=256m
- Response
- You can track responses via RSS / ATOM feed
- Posted
- Filed under JSP, JAVA
workspace의 .settings디렉토리의 org.eclipse.wst.common.project.facet.core.xml
<?xml version="1.0" encoding="UTF-8"?>
<faceted-project>
<runtime name="Apache Tomcat v7.0"/>
<fixed facet="wst.jsdt.web"/>
<installed facet="java" version="1.7"/>
<installed facet="jst.web" version="3.0"/>
<installed facet="wst.jsdt.web" version="1.0"/>
</faceted-project>
--확인 --
web.xml 파일 확인
<web-app xmlns:xsi="http://www.w3.org/2001/XMLSchema-instance" xmlns="http://java.sun.com/xml/ns/javaee"
xmlns:web="http://java.sun.com/xml/ns/javaee/web-app_2_5.xsd" xsi:schemaLocation="http://java.sun.com/xml/ns/javaee http://java.sun.com/xml/ns/javaee/web-app_2_5.xsd"
version="2.5">
<web-app version="3.0" xmlns="http://java.sun.com/xml/ns/javaee" xmlns:xsi="http://www.w3.org/2001/XMLSchema-instance"
xsi:schemaLocation="http://java.sun.com/xml/ns/javaee http://java.sun.com/xml/ns/javaee/web-app_3_0.xsd">
- Response
- You can track responses via RSS / ATOM feed
- Posted
- Filed under C#
private void wb_DocumentCompleted(object sender, WebBrowserDocumentCompletedEventArgs e){
if (e.Url.AbsoluteUri == wb.Url.AbsoluteUri) {
}
}
ajax 용 웹페이지 파싱할 때위처럼 구현하면 여러번 사이트 로딩 되는 현상을 방지 할 수 있다.
if (e.Url.AbsoluteUri == wb.Url.AbsoluteUri) {
}
}
ajax 용 웹페이지 파싱할 때위처럼 구현하면 여러번 사이트 로딩 되는 현상을 방지 할 수 있다.
- Response
- You can track responses via RSS / ATOM feed
- Posted
- Filed under 분류없음
[원문]:http://lintut.com/install-mariadb-on-centos/
MariaDB 10.0 is the development version of MariaDB. It is built on the MariaDB 5.5 series with backported features from MySQL 5.6 and entirely new features not found anywhere else.
For CentOS, RedHat, and Fedora, it is highly recommended to install from a repository using YUM. This page walks you through the simple steps.
Adding the MariaDB YUM Repository
We highly recommended to use custom MariaDB YUM repository to install. Create a repo file under/etc/yum.repos.d/MariaDB.repo, Copy and paste following line under MariaDB repository:
Add repository on Centos 6.5 32-bit
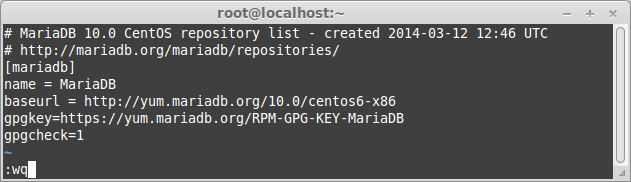
# vi /etc/yum.repos.d/MariaDB.repo
and paste following line:
# MariaDB 10.0 CentOS repository list - created 2014-03-12 12:46 UTC
# http://mariadb.org/mariadb/repositories/
[mariadb]
name = MariaDB
baseurl = http://yum.mariadb.org/10.0/centos6-x86
gpgkey=https://yum.mariadb.org/RPM-GPG-KEY-MariaDB
gpgcheck=1
Add repository on Centos 6.5 64-bit
# vi /etc/yum.repos.d/MariaDB.repo
and paste following line:
# MariaDB 10.0 CentOS repository list - created 2014-03-12 12:47 UTC
# http://mariadb.org/mariadb/repositories/
[mariadb]
name = MariaDB
baseurl = http://yum.mariadb.org/10.0/centos6-amd64
gpgkey=https://yum.mariadb.org/RPM-GPG-KEY-MariaDB
gpgcheck=1
Add MariaDB 10.0 repository on CentOS 6.4 -32-bit
The example file above includes a gpgkey line to automatically fetch the GPG key we use to sign the repositories. This key enables yum and rpm to verify the integrity of the packages it downloads.
Installing MariaDB 10.0 with YUM
With the repo file in place you can now install MariaDB like so:
# yum install MariaDB-server MariaDB-client -y
Starting MariaDB
After complite installation process, start MariaDB width following command:
# service mysql start
or
# /etc/init.d/mysql start
Set MariaDB to start on boot:
# chkconfig mysql on
Secure MariaDB after installation
- Set (Change) root password
- Remove anonymous users
- Disallow root login remotely
- Remove test database and access to it
- Reload privilege tables
To secure MariaDB installation enter following command:
# mysql_secure_installation
Example output:
NOTE: RUNNING ALL PARTS OF THIS SCRIPT IS RECOMMENDED FOR ALL MariaDB
SERVERS IN PRODUCTION USE! PLEASE READ EACH STEP CAREFULLY!
In order to log into MariaDB to secure it, we'll need the current
password for the root user. If you've just installed MariaDB, and
you haven't set the root password yet, the password will be blank,
so you should just press enter here.
Enter current password for root (enter for none):
OK, successfully used password, moving on...
Setting the root password ensures that nobody can log into the MariaDB
root user without the proper authorisation.
Set root password? [Y/n] y
New password: ENTER YOUR PASSWORD
Re-enter new password: REPEAT YOUR PASSWORD
Password updated successfully!
Reloading privilege tables..
... Success!
By default, a MariaDB installation has an anonymous user, allowing anyone
to log into MariaDB without having to have a user account created for
them. This is intended only for testing, and to make the installation
go a bit smoother. You should remove them before moving into a
production environment.
Remove anonymous users? [Y/n] y
... Success!
Normally, root should only be allowed to connect from 'localhost'. This
ensures that someone cannot guess at the root password from the network.
Disallow root login remotely? [Y/n] y
... Success!
By default, MariaDB comes with a database named 'test' that anyone can
access. This is also intended only for testing, and should be removed
before moving into a production environment.
Remove test database and access to it? [Y/n] y
- Dropping test database...
... Success!
- Removing privileges on test database...
... Success!
Reloading the privilege tables will ensure that all changes made so far
will take effect immediately.
Reload privilege tables now? [Y/n] y
... Success!
Cleaning up...
All done! If you've completed all of the above steps, your MariaDB
installation should now be secure.
Thanks for using MariaDB!
Restart MariaDB:
# service mysql restart
Try to connect to MariaDB:
# mysql -u root -p
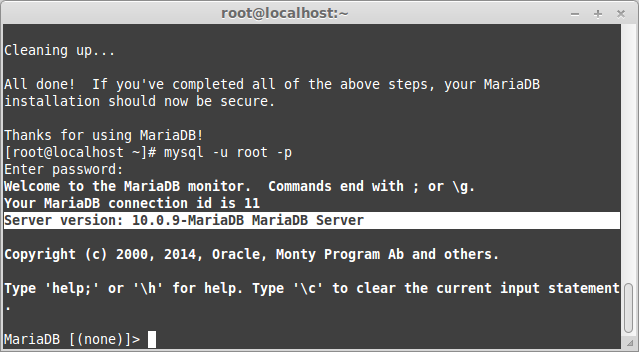
Connect to MariaDB 10.0
That’s it. For questions please use comments.
- Response
- You can track responses via RSS / ATOM feed